
The process of picking a lock
Locks are found throughout the wasteland on doors, safes and boxes. In Fallout 3, Fallout: New Vegas, and Fallout 4 the player character can use their Lockpick skill to pick a lock using bobby pins. Some can also be unlocked with keys.
Lockpicking in Fallout, Fallout 2 and Fallout Tactics: Brotherhood of Steel
Picking locks in older Fallout games is simpler than in Fallout 3 and Fallout: New Vegas; instead of a mini-game, a lockpick skill roll will take place every time the skill is used on a door or a container. A successful roll will open the lock, a failure will not. A critical failure will either break the lockpicks or jam the lock itself, rendering it unavailable until the next day.
The Lockpick skill can be used on unlocked doors and containers as well, and locking them will give the same amount of experience as unlocking a locked one (25 XP). Note that each door or container can only give experience once via lockpicking.
Lockpicking in Fallout 3 and Fallout: New Vegas
Lock difficulties
| Difficulty | Required Lockpick | XP reward |
|---|---|---|
| Very Easy | 0 | 20 |
| Easy | 25 | 30 |
| Average | 50 | 40 |
| Hard | 75 | 50 |
| Very Hard | 100 | 60 |
Locks come in 5 difficulties: very easy, easy, average, hard and very hard. Which locks can be picked depends on one's Lockpick skill (see table to the right). Difficulty and the Lockpick skill also determine the probability of success for an attempt to force a lock open (see force lock below).
Experience points
Depending on its difficulty (harder locks reward more XP), successfully opening a lock grants an amount of XP. Without any XP reward-increasing perks, each level rewards the lockpicker with the XP shown in the table above.
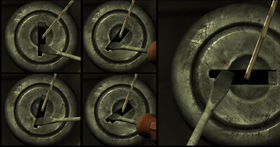
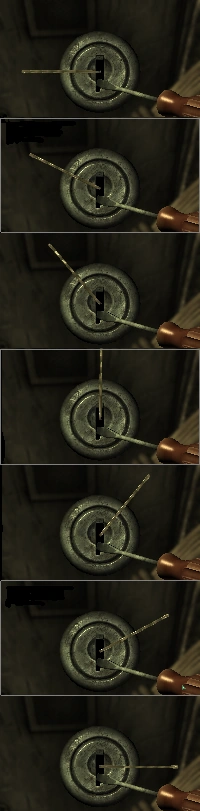
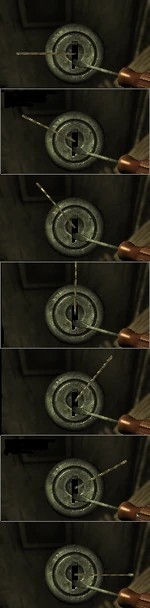
Picking a lock
In order to pick a lock must have a Lockpick skill high enough for the difficulty of the lock, and you must possess one or more bobby pins. Bobby pins are weightless items, often found in first aid kits and locked containers.
If the conditions are met, a mini game is activated. A bobby pin and screwdriver (a free, weightless item which does not appear in the inventory) are inserted into the keyhole of the lock. The lockpicker attempts to find the correct position for the pin, which is checked by turning the screwdriver as if it were a key. The further the screwdriver turns the lock, the closer the pin is to the correct position. Once the screwdriver is able to turn the lock a full 90 degrees, the lock opens.
The basic premise is complicated by several factors. If the lockpicker fails to determine the correct position of the lock too many times, the bobby pin will break, forcing them to use another in order to continue the attempt. The number of times it takes for a pin to break varies, as placing too much force on the screwdriver will cause it to break faster than a light touch. The integrity of the pin can be roughly tracked by how violently it shakes on a failed attempt. When it is about to break, it will bounce out of the center position. The mini game can be exited and restarted, which will prevent the pin from breaking, but this will also reset the correct position for the pin. Since there are dozens of bobby pins in the main game alone, it is often more practical to simply break one or two pins on a difficult lock. In addition, the difficulty level of the lock determines how accurately the bobby pin must be placed and how easy the pin is to break. A very easy lock needs little to no pin adjustment for a successful attempt, in turn making the likelihood of breaking a pin low. A very hard lock, conversely, requires extremely precise placement, and thus the repeated checks to find the correct position will wear out a pin quickly.
Controls for PC computers
The bobby pin is moved with the mouse, in a semi-circle around the top of the lock. The screwdriver is moved by tapping any movement key. In order to get the most out of a single pin, it is recommended to gently tap the screwdriver until it encounters resistance, then adjust the pin position and repeat until the lock is opened.
Controls for consoles and joypads
The bobby pin is moved with one analog stick, and the screwdriver with the other. The controller will vibrate with the wiggling of the bobby pin, and vibrate strongly as it starts to break. As with on computer machines, a light touch is recommended to keep the pin intact as long as possible.
Force lock
It is also possible to skip the mini game by attempting to force a lock open. The probability of success for this action depends on the Lockpick skill and the difficulty of the lock. This is far less reliable than the mini game, as the only combination which has a 100% success rate is a very easy lock with a Lockpick skill of 90-100; every other combination will have a smaller percentage.
Failing to force the lock open it will break it, and no other attempt at opening it can be made without the Infiltrator perk (which grants a second attempt) or the appropriate key.
List of locks (Fallout 3)
Missing data
This article is missing some required data. You can help Nukapedia by filling it in.
|
| Closest map marker | Directions | Difficulty |
|---|---|---|
| Chryslus Building | Lower offices, first door on the left in the hallway. | Very Hard |
| Citadel | B-Ring: Elder Lyons' safe in the far back of his room, near his bed. | Very Hard |
| Citadel | Citadel laboratory: The Armory is located in an extra room on the bottom level with a locked cell door. | Very Hard |
| Corvega factory | South of it, a footlocker in a flipped over truck trailer. | Very Hard |
| Dukov's Place | South of it, in a small enclosed raider camp. ammunition box behind a counter. | Very Hard |
| Falls Church | The southernmost of the Office buildings with a bunch of super mutants has a 100 skill door inside. | Very Hard |
| Fort Bannister | In a bunker to the right just as one enters the front entrance. | Very Hard |
| Fort Constantine | Bomb Storage, and several doors within. | Very Hard |
| Grayditch | Dumpster, behind the diner. | Very Hard |
| L.O.B. Enterprises | Safe in the CEO office. | Very Hard |
| Mama Dolce's | Food Distribution: 2 doors on an isolated catwalk with blank walls behind them. | Very Hard |
| MDPL mass relay station | Safe inside. | Very Hard |
| Megaton | Back door to Moriarty's Saloon | Very Easy |
| Megaton | Mister Burke's house | Very Hard |
| Megaton | Craterside Supply | Very Hard |
| Megaton | Desk in Water processing plant; see Leo's Drug Habit | Very Hard |
| Megaton | Megaton armory | Very Hard |
| Meresti trainyard | First aid kit in Robert's area in Meresti service tunnel | Very Easy |
| Meresti trainyard | Ammunition box in Robert's area in Meresti service tunnel | Average |
| Meresti trainyard | 3 locked first aid kits in Meresti Metro station, one behind the counter in Karl's shop, one up the escalators on a shelf and one in Vance's room | Very Easy |
| Meresti trainyard | 2 ammunition boxes behind the counter in Karl's shop | Average |
| Megaton | The cabinet in Moriarty's room in Moriarty's Saloon can contain quite a few caps | Hard |
| Meresti trainyard | Ammunition box behind the counter in Karl's shop | Hard |
| Meresti trainyard | Cabinet up the escalators | Very Easy |
| Meresti trainyard | Cabinet up the escalators | Hard |
| Meresti trainyard | Wall safe in Vance's room on the second floor, also can be unlocked by terminal next to it | Average |
| Minefield | Entrance to Gibson house, also can be opened by Ridgefield gate key | Very Easy |
| Minefield | Ammunition box in Arkansas' sniping post | Easy |
| Minefield | Entrance to Gillian house, also can be opened by Ridgefield gate key | Average |
| Minefield | Entrance to Zane house, also can be opened by Ridgefield gate key | Average |
| Minefield | Entrance to Benson house, also can be opened by Ridgefield gate key | Hard |
| Minefield | Wall safe behind dresser in upstairs bedroom in Benson house | Easy |
| Minefield | Wall safe behind book case in upstairs bedroom in Gibson house | Easy |
| Minefield | Small model house inside the Gibson house (the key to this model house can be found inside the Capitol Post building in L'Enfant Plaza on the body of Gibson) | Very Hard |
| Minefield | Floor safe under bed in upstairs bedroom in Gillian house | Easy |
| Minefield | Wall safe behind dresser on the first floor of the Zane house | Easy |
| Museum of History | On the 2nd floor. | Very Hard |
| National Archives | Along the "front door" (long way) entrance to Button Gwinnett's office. | Very Hard |
| National Archives | Gate, Archives Sub-basement, on top of stair case, opposite to "Door to Archives Secure Wing East". | Very Hard |
| Nuka-Cola Factory | Door straight ahead as you enter. It can be opened from other side with a switch on the left. | Very Hard |
| Oasis | Gate to the Damp Caves to fulfill the Oasis quest. | Very Hard |
| Old Olney | Olney sewers has one. | Very Hard |
| Rivet City | In the broken bow at the west end of the ship. Bear in mind there is a frag mine on the left as upon entering. This door can also be unlocked by activating a flip switch just on the other side of the door if the broken bow is entered the long way (underwater entrance). | Very Hard |
| Rockbreaker's Last Gas | Gun Locker in the abandoned shack at the top of the cliff. Contains the Victory rifle. | Very Hard |
| Roosevelt Academy | Roosevelt Library | Very Hard |
| SatCom Array NW-07c | First aid kit 50 metres away due East inside at the back of a blue semi-truck. Also find "Internment Orders" holotape at the mouth of the truck's rear opening. | Very Hard |
| Springvale School | On the lower level - leads to an unfinished tunnel towards Vault 101 | Very Hard |
| Springvale School | On the second level - ammunition box located next to a terminal. | Easy |
| Super-Duper Mart | Pharmacy in the back of the building | Easy |
| VAPL-58 Power Station | Safe inside, also north of it, inside a walled up cable tower. | Very Hard |
| Wheaton Armory | In a very radioactive bunker with an excellent stash of weapons behind it. | Very Hard |
| Vault 87 | Living Quarters, there is a safe (southern part of the map). | Hard |
| Vault 101 | In atrium, the door to the Overseer's office. | Very Easy |
| Vault 101 | In James' office, the picture on the wall of Catherine's favorite passage. | Average |
List of locks (Fallout: New Vegas)
| Closest map marker | Directions | Difficulty |
|---|---|---|
| Atomic Wrangler casino | Ground level, behind the bar, near the bathroom there is a door. | Very hard |
| Bitter Springs recreation area | In the office, there is a safe. | Average |
| Black Mountain | Behind the broadcast building after reaching the top there's a gate. | Hard |
| Black Mountain | One of the large, light-blue trunks in the large makeshift shelter near where Neil awaits the Courier after their initial encounter. | Average |
| Bloodborne cave | Go straight upon entering the cave and there will be a gate, be careful as there is a trap wire right behind the gate. | Very Hard |
| Bloodborne cave | The very hard gate has to be picked gate first, and then there is a trunk. | Average |
| Bradley's shack | Behind his bed is a first aid box. | Very Easy |
| Brewer's beer bootlegging | The door to the cellar. | Average |
| Brewer's beer bootlegging | In the basement is a gun cabinet. Can also be unlocked with the key found in the next room on the table with the chemistry set. | Hard |
| Brewer's beer bootlegging | In the southeastern corner of the cellar is an explosives crate. | Average |
| Camp Forlorn Hope | Across from the Quartermaster's tent; the storage shed door. | Very Hard |
| Camp Forlorn Hope | In the Medical Center, there is a locker. | Hard |
| Camp McCarran | In a large tent north of the central entrance to Camp McCarran terminal building there is a Grenade Box. | Average |
| Camp McCarran terminal building | The MP confiscated goods trunk found on the second floor, across from the interrogation room. Can also be unlocked with the NCR MP confiscated goods trunk key. | Very Hard |
| Camp Searchlight | In the Seachlight NCR storage room where Logan is found. Can also be accessed via the nearby NCR storage database terminal (Average). | Average |
| Cannibal Johnson's cave | Next to Cannibal Jonson's bed there is a locked trunk. | Average |
| Charleston cave | In the center of the large room directly south of the entrance there is an ammunition box. | Easy |
| Crimson Caravan Company | In the guard barracks there is an ammunition box. | Easy |
| Crimson Caravan Company | In the Crimson Caravan main office, the desk that Alice McLafferty sits behind. | Very Easy |
| Crimson Caravan Company | In the Crimson Caravan main office, there is a safe between the lockers and the desk that Alice McLafferty sits behind. | Average |
| El Rey Motel | At the western end of the bridge near the motel, there is a mine box near a sandbag fortification. | Easy |
| Emergency service railyard | At the southwest corner of the building, there is a metal box under the wooden platform. | Easy |
| Freeside | In the Atomic Wrangler casino, the door in the large entrance room labeled for entry by authorized personnel only. | Very Hard |
| Gomorrah | Various doors throughout the building. | Very Hard |
| Goodsprings | Northeast exterior door of Prospector Saloon. | Very Easy |
| Goodsprings | Southwest exterior door of Prospector Saloon. | Very Easy |
| Goodsprings | Safe inside bedroom of Goodsprings Home directly SE from Doc Mitchell's house. | Average |
| Goodsprings | Safe inside Goodsprings schoolhouse. It can also be unlocked via the nearby Average terminal. | Easy |
| Goodsprings | Floor safe inside Goodsprings gas station. It is located behind the counter, partially concealed by the bed. | Easy |
| Goodsprings | Floor safe in south room of Prospector Saloon. It can also be unlocked via the nearby Easy terminal. | Hard |
| Gun Runners (Fallout: New Vegas) | The chain gate to the left of the kiosk. | Average |
| Gun Runners (Fallout: New Vegas) | The locker on the right in the room with the Gun runner terminal. | Average |
| HELIOS One | A door at the southeastern corner of HELIOS One Power Plant. | Very Easy |
| HELIOS One | A safe at the Solar collection tower down the stairs from the entrance. | Average |
| HELIOS One | A safe at the Solar collection tower, downstairs in a southern room. | Average |
| Hidden supply cave | The exterior door of the cave. | Average |
| Hidden Valley | The door in the bunker that is next to the intercom. | Very Hard |
| Jacobstown | The exterior door of the Jacobstown Bungalow that is closest to the front doors of the Jacobstown lodge. | Average |
| Jean Sky Diving | There is a locker inside the building. It can also be unlocked with the key on the nearby table. | Average |
| Lucky 38 | At the cocktail lounge there is a safe. | Average |
| Lucky 38 | At the cocktail lounge is where a briefcase can be found. | Hard |
| NCR Correctional Facility | On the first floor of the Administration building, there is a First aid box. | Easy |
| NCR Correctional Facility | On the second floor of the Administration building, there is a door directly ahead of the top of the stairs. | Average |
| NCR Correctional Facility | On the second floor of the Administration building, there is a wall safe directly behind Eddie. | Average |
| NCR Correctional Facility | In Cell Block A, there is an armor case in the last cell on the right. | Average |
| NCR Correctional Facility | In Cell Block A, there is a mine box in the last cell on the right. | Easy |
| NCR Correctional Facility | In Cell Block B, there's a footlocker in the first cell on the right. | Very Easy |
| NCR Correctional Facility | In Cell Block B, the first cell door to the left. | Easy |
| Nipton | The cage door in the booby-trapped house East of the Nipton General Store. | Average |
| Nipton | The refrigerator in the booby-trapped house East of the Nipton General Store. | Easy |
| Nipton | The kitchen cabinet in the booby-trapped house East of the Nipton General Store. | Average |
| Nipton | The desk in the booby-trapped house East of the Nipton General Store. | Very Easy |
| Nipton | The bedroom cabinet in the booby-trapped house East of the Nipton General Store. | Easy |
| Nipton | The safe in the bathroom of the booby-trapped house East of the Nipton General Store. | Very Easy |
| Nipton General Store | The door behind the counter. | Easy |
| Nipton Hall | In Town Hall Steyn's Office, there is a door. | Very Easy |
| Nipton Hall | In Town Hall Steyn's Office, the door to the room behind the mayor's office. | Average |
| Nipton Road Pit Stop | There is a Grenade Box in the destroyed house to the North of the road. | Easy |
| Novac | Inside the Dino Dee-lite front desk, behind the counter there is a floor safe. | Easy |
| Novac | Inside the Dino Bite gift shop, behind the counter there is a door. | Very Easy |
| Novac | Inside Ranger Andy's bungalow, there is a gun case atop a shelf on the wall. | Average |
| Novac | Inside McBride house, there is a first aid box in the bathroom. | Easy |
| Novac | Inside McBride house, there is a gun case atop a shelf on the wall. | Average |
| Novac | Inside the Novac house just north of McBride house, there is a first aid box in the bathroom. | Very Easy |
| Novac | Inside the Novac house just north of McBride house, there is a footlocker in the bedroom. | Average |
| Novac | Inside the Novac house just south of No-bark's shack, there is a footlocker under the bed in the bedroom. | Easy |
| Primm | Inside the Bison Steve Hotel, there's a door behind the counter to the right of the front entrance. | Hard |
| Primm | Inside the Bison Steve Hotel, there is a safe in the room where the Bison Steve maintenance key can be found. | Average |
| Primm | Inside the Bison Steve Hotel, there is a floor safe behind the counter in the gift shop. Contains Lucky | Hard |
| Primm | Inside the Bison Steve Hotel, the maintenance door in the SE corner of the room where the elevator can be found. Can also be unlocked with the Bison Steve maintenance key. | Easy |
| Primm | On the second floor of the Bison Steve Hotel, the door immediately to the left of the elevator. | Very Easy |
| Primm | On the second floor of the Bison Steve Hotel, a door near the SW corner. | Very Easy |
| Primm | On the third floor of the Bison Steve Hotel, the gun cabinet in the large destroyed room. Can also be unlocked with the Worn key (Bison Steve hotel) | Average |
| Primm | The door leading to the cashier's cage in the Vicki and Vance Casino. | Very Easy |
| Primm | The sixth safe from the left on the top row of safes in Vicki and Vance Casino's cashier's cage. | Easy |
| Primm | The first safe from the left in the middle row of safes in Vicki and Vance Casino's cashier's cage. | Hard |
| Primm | The fifth safe from the left on the bottom row of safes in Vicki and Vance Casino's cashier's cage. | Easy |
| Ranger station Bravo | Inside the truck trailer at the southwestern corner of the station, there are four total Ammunition boxes. | Average |
| Ranger station Delta | Inside the communications tent, there is a Gun Case. | Average |
| Ranger station Echo | Inside the communications hut, there is an Ammunition Box. | Easy |
| Ranger station Foxtrot | Inside the tent, there is a First Aid Box. | Very Easy |
| Ranger station Foxtrot | Inside the tent, there is a Mine Box. | Very Easy |
| REPCONN headquarters | A door on the main floor, to the right of the lobby as soon as the building is entered. Can also be unlocked with the nearby Average terminal. | Average |
| REPCONN headquarters | A door on the main floor, to the right of two protectron bays. | Average |
| REPCONN headquarters | A door on the main floor, near the Shipping sign. | Very Hard |
| REPCONN headquarters | A door on the main floor, behind the counter in the gift shop. | Hard |
| REPCONN headquarters | A safe in the room behind the gift shop. | Average |
| REPCONN headquarters | On the main floor past three exhibit rooms is a double broken door. | Average |
| REPCONN headquarters | A door to the second floor, located by climbing the ramp created by the broken floor in the room with the Q-35 matter modulator. | Hard |
| REPCONN headquarters | On the second floor, across the hall from the Hard locked door containing the Q-35 matter modulator, there are two separate doors. | Average |
| REPCONN headquarters | On the second floor, across the hall from the Hard locked door containing the Q-35 matter modulator, there are two separate doors. | Average |
| REPCONN headquarters | A safe in the northwestern corner of the top floor. Can also be unlocked via the nearby terminal. | Easy |
| REPCONN test site | On the road leading to the site, to the southeast there's a Grenade Box in the sandbag-fortified area where the road curves slightly. | Easy |
| REPCONN test site | In the lobby, there's a door directly behind the semi-circular desk. | Easy |
| REPCONN test site | Up the stairs beyond the locked lobby door, the first door on the left. | Easy |
| REPCONN test site | Up the stairs beyond the locked lobby door, inside the locked room on the left, there's a safe. | Easy |
| REPCONN test site | Up the stairs beyond the locked lobby door, inside the locked room on the left, there's a door. | Easy |
| REPCONN test site | Up the west stairs beyond the broken double doors, the first door on the left. | Very Easy |
| REPCONN test site | On the third floor, in a carpeted room. There is a safe behind the semi-circular desk. | Average |
| REPCONN test site | On the third floor, the room across the hall from the carpeted room. | Very Easy |
| REPCONN test site | The door to the REPCONN basement. Can also be unlocked with the key given by Jason Bright. | Easy |
| REPCONN test site | In REPCONN basement, the southern room. Harland is inside. | Easy |
| Residential District |
South of the entrance to the Villa and directly to the east of a staircase, there is a gate. | Average |
| Residential District |
Inside the Cloud in the courtyard with two trees there is an ammunition box. A RadAway is nearby for visual reference. | Average |
| Ruby Hill mine | In the area filled with water. You can get there either by swimming or walking, there is a box. | Average |
| Ruby Hill mine | In the area filled with water. You can get there either by swimming or walking, there is a box. | Hard |
| Silver Rush | The door at the southwest corner of the large main room. | Hard |
| Silver Rush | A safe in the room leading to the stairs. Can also be unlocked with the terminal on the nearby table. | Hard |
| Silver Rush | A door up the stairs, straight down the first hall on the left. | Hard |
| Silver Rush | A door up the stairs, straight down at the end of the first hall. | Hard |
| Sloan | Inside the Worker barracks, the locker on the right in the back of the room. | Easy |
| Sniper's nest | A Gun Case on the floor. | Very Hard |
| Sunset Sarsaparilla Headquarters | Go up a flight of stairs and down another to the ground floor. The door that is already open and broken can be picked for the XP. | Very Hard |
| The Prospector's Den | In the second room on the right, there is an Armor Case. | Average |
| The Prospector's Den | In the second room on the right, there is a Gun Case. | Easy |
| Ultra-Luxe | The cashier's door in the lobby. | Average |
| Vault 21 | The door to Sarah's room. It's located northeast from the entrance. | Average |
| Vault 21 | Inside Sarah's room there is a locked dresser next to the bed. | Hard |
| Villa |
In the area directly east of the fountain where the hologram of Father Elijah is encountered, there's a metal box on the second-floor walkway. It can be reached via the stairs from the nearby gift shop. | Average |
| Villa |
In the shop directly south from the Salida del Sol entrance, there is a cash register. One of Dean's Secret Stashes can be found here as well. | Hard |
| Villa |
The door to the Villa Police Station. | Very Easy |
| Villa |
North of the door to the Villa Police Station is where a courtyard with two tree planters can be found. There is a blue door on the west wall. Up the stairs inside this door, there is a gun cabinet. | Average |
| Villa |
Near the door to the Villa Police Station, there is a metal box. | Average |
| Wins hideout | Inside the Wins hideout is The Wins' safe. Can also be unlocked via dialog check (Speech 55) with Pauline Wins. | Very Hard |
List of locks (Fallout 4)
| Closest map marker | Directions | Difficulty |
|---|---|---|
| College Square | Door, top of firewell. | Advanced |
| College Square | Door, subway station, rail level. | Expert |
| College Square | Suitcase, subway station, rail level. | Novice |
| College Square | Suitcase, subway station, ticket level. | Novice |
| College Square | Safe, shop to the west. | Advanced |
| College Square | Suitcase in bus. | Novice |
| College Square | Pulowski Shelter. | Novice |
| College Square | Kiosk outside subway station. | Novice |
| College Square | Door in diner. | Novice |
| College Square | Suitcase, second floor of corner building to the southeast. | Novice |
| HalluciGen, Inc. | Backdoor, on the north wall. | Master |
| Med-Tek Research | Safe in demolished house. | Advanced |
| Vault 111 | Starting area. | Master |
| Super-Duper Mart | Parking garage. | Novice |
| Concord | Drug store, wall safe on first floor (US= 2nd floor) at top of broken floor ramp. | Expert |
| Concord | Church, safe rear top floor up stairs in small office space. | Expert |
| West Everett Estates | House door. | Advanced |
| West Everett Estates | Safe inside Lance's (the locked) house, far room to the left. | Advanced |
| West Everett Estates | Safe, inside Lance's (the locked) house, next to Lance's Terminal. | Expert |
| West Everett Estates | Safe, inside the house facing Hammer's. | Novice |
| West Everett Estates | Wall safe, in the backyard bunker. | Expert |
| West Everett Estates | Tool box, in the backyard bunker. | Novice |
| West Everett Estates | First aid, in the backyard bunker. | Novice |
| West Everett Estates | Steam trunk, in the truck. | Expert |
| West Everett Estates | Safe, inside the house opposite Hammer's. | Master |
Behind the scenes
The way in which lock picking is portrayed in Fallout 3 and Fallout: New Vegas is almost completely inaccurate. A torque wrench (screwdriver) and a pick (bobby pin) are present, but the action of actually picking the lock is nothing like what a pin tumbler lock or most other locks with a cylindrical design would require to successfully manipulate the lock.