No edit summary |
|||
| (43 intermediate revisions by 20 users not shown) | |||
| Line 6: | Line 6: | ||
|location =[[Engineering core]]<br />[[Cryo lab]]<br />[[Cryo lab|Cryo storage]]<br />[[Hangar]]<br />[[Robot assembly]]<br />[[Decompression chamber]]<br />[[Space walk]]<br />[[Observation deck]] |
|location =[[Engineering core]]<br />[[Cryo lab]]<br />[[Cryo lab|Cryo storage]]<br />[[Hangar]]<br />[[Robot assembly]]<br />[[Decompression chamber]]<br />[[Space walk]]<br />[[Observation deck]] |
||
|given by =[[Sally (Mothership Zeta)|Sally]] |
|given by =[[Sally (Mothership Zeta)|Sally]] |
||
| − | |reward =300 [[Experience |
+ | |reward =300 [[Experience Points|XP]] |
|previous =[[Not of This World]] |
|previous =[[Not of This World]] |
||
|leads to =[[This Galaxy Ain't Big Enough...]] |
|leads to =[[This Galaxy Ain't Big Enough...]] |
||
| Line 20: | Line 20: | ||
}}{{Games|FO3MZ}} |
}}{{Games|FO3MZ}} |
||
| + | {{Quotation|That's it. I'm sick of running. Let's finish these aliens off and get the hell home.|[[Elliott Tercorien]]}}[[File:Fo3MZ_ElliottTercorien SickOfRunning.ogg|noicon|135px|center]] |
||
| ⚫ | |||
| + | |||
| ⚫ | |||
==Quick walkthrough== |
==Quick walkthrough== |
||
| Line 26: | Line 28: | ||
{{chart/start|class=mw-collapsible mw-collapsed}} |
{{chart/start|class=mw-collapsible mw-collapsed}} |
||
{{chart|quest|colspan=14|quest=Main Quest: Among the Stars|class=va-chart-quest}} |
{{chart|quest|colspan=14|quest=Main Quest: Among the Stars|class=va-chart-quest}} |
||
| − | {{chart| | | |!| }} |
+ | {{chart| | | |!| | | }} |
{{chart|data1|colspan=14|data1=Talk to Sally.|class=va-chart-body}} |
{{chart|data1|colspan=14|data1=Talk to Sally.|class=va-chart-body}} |
||
{{chart| |,|-|'| | | }} |
{{chart| |,|-|'| | | }} |
||
| − | {{chart|data1|-|data2 |
+ | {{chart|data1|-|data2|boxstyle_data1=width:200px|boxstyle_data2=width:200px |
|data1=Go to the Cryo Core. |
|data1=Go to the Cryo Core. |
||
| − | |data2=(Optional) Request help in the Cryo Core from [[ |
+ | |data2=(Optional) Request help in the Cryo Core from [[Elliott Tercorien]].|class=va-chart-body}} |
{{chart| |`|-|v|-|'| }} |
{{chart| |`|-|v|-|'| }} |
||
{{chart|data1|colspan=14|data1=Find and overload the power module in the Cryo Core.|class=va-chart-body}} |
{{chart|data1|colspan=14|data1=Find and overload the power module in the Cryo Core.|class=va-chart-body}} |
||
{{chart| |,|-|'| | | }} |
{{chart| |,|-|'| | | }} |
||
| − | {{chart|data1|-|data2 |
+ | {{chart|data1|-|data2|boxstyle_data1=width:200px|boxstyle_data2=width:200px |
|data1=Go to the Hangar. |
|data1=Go to the Hangar. |
||
|data2=(Optional) Request help in the Hangar from [[Paulson]].|class=va-chart-body}} |
|data2=(Optional) Request help in the Hangar from [[Paulson]].|class=va-chart-body}} |
||
| Line 41: | Line 43: | ||
{{chart|data1|colspan=14|data1=Find and overload the power module in the Hangar.|class=va-chart-body}} |
{{chart|data1|colspan=14|data1=Find and overload the power module in the Hangar.|class=va-chart-body}} |
||
{{chart| |,|-|'| | | }} |
{{chart| |,|-|'| | | }} |
||
| − | {{chart|data1|-|data2 |
+ | {{chart|data1|-|data2|boxstyle_data1=width:200px|boxstyle_data2=width:200px |
|data1=Go to the Robot Assembly. |
|data1=Go to the Robot Assembly. |
||
|data2=(Optional) Request help in the Robot Assembly from [[Somah]].|class=va-chart-body}} |
|data2=(Optional) Request help in the Robot Assembly from [[Somah]].|class=va-chart-body}} |
||
{{chart| |`|-|v|-|'| }} |
{{chart| |`|-|v|-|'| }} |
||
{{chart|data1|colspan=14|data1=Find and overload the power module in the Robot Assembly.|class=va-chart-body}} |
{{chart|data1|colspan=14|data1=Find and overload the power module in the Robot Assembly.|class=va-chart-body}} |
||
| − | {{chart| | | |!| }} |
+ | {{chart| | | |!| | | }} |
| − | {{chart|data1|colspan=14|data1=Take the |
+ | {{chart|data1|colspan=14|data1=Take the space suit from [[Hartigan|Colonel Hartigan]].|class=va-chart-body}} |
| − | {{chart| | | |!| }} |
+ | {{chart| | | |!| | | }} |
{{chart|data1|colspan=14|data1=Enter the decompression chamber and activate the pressurisation sequence.|class=va-chart-body}} |
{{chart|data1|colspan=14|data1=Enter the decompression chamber and activate the pressurisation sequence.|class=va-chart-body}} |
||
| − | {{chart| | | |!| }} |
+ | {{chart| | | |!| | | }} |
{{chart|data1|colspan=14|data1=Find and activate all three exposed panels.|class=va-chart-body}} |
{{chart|data1|colspan=14|data1=Find and activate all three exposed panels.|class=va-chart-body}} |
||
| − | {{chart| | | |!| }} |
+ | {{chart| | | |!| | | }} |
{{chart|data1|colspan=14|data1=Step in to the now active central teleporter.|class=va-chart-body}} |
{{chart|data1|colspan=14|data1=Step in to the now active central teleporter.|class=va-chart-body}} |
||
| − | {{chart| | | |!| }} |
+ | {{chart| | | |!| | | }} |
| − | {{chart|reward1|colspan=14|reward1=Reward: 300 [[Experience |
+ | {{chart|reward1|colspan=14|reward1=Reward: 300 [[Experience Points|XP]]|class=va-chart-reward}} |
| − | {{chart| | | |!| }} |
+ | {{chart| | | |!| | | }} |
{{chart|quest|colspan=14|quest=Leads to: [[This Galaxy Ain't Big Enough...]]|class=va-chart-quest}} |
{{chart|quest|colspan=14|quest=Leads to: [[This Galaxy Ain't Big Enough...]]|class=va-chart-quest}} |
||
{{chart/end}} |
{{chart/end}} |
||
| Line 62: | Line 64: | ||
==Detailed walkthrough== |
==Detailed walkthrough== |
||
===Destroy the generators=== |
===Destroy the generators=== |
||
| − | + | This quest is activated upon reaching the [[engineering core]] with the objective to destroy three of the ship's generators located in the [[hangar]], [[Cryo lab|cryo lab/cryo storage]], and [[robot assembly]] areas, in order to gain access to the [[decompression chamber]] to proceed further. |
|
| + | * The option is available to bring [[Somah]] along, or one of the three abductees revived in the engineering core's southern portion to each of these three locations. See below for who will accompany the Lone Wanderer to which location; if the wrong companion is selected, they will tell you they are leaving once you enter. |
||
| − | |||
| + | * The generators are destroyed such as with the one blown up when freeing [[Sally (Mothership Zeta)|Sally]] in the [[Holding cells|holding cells area]], i.e. using the control to bring the core up from the floor and then disabling the three cooling devices surrounding it. |
||
| − | * Note the [[Samurai's sword (Fallout 3)|Samurai's sword]] disappears once you've destroyed all three generators, so if you want to collect it you should visit the [[maintenance level]] before this quest is done. |
||
| + | * An overheating generator will be surrounded by more and more visible heat radiation which results in the generator blowing up in roughly 30 seconds. |
||
| + | * Apart from the above locations, there are three other new locations initially reachable from the engineering core: the [[cargo hold]], [[engine room]], and [[maintenance level]] are optional and unconnected to the quest, with the latter containing one of the [[alien captive recorded log]]s. These will become inaccessible once the Lone Wanderer enters the [[space walk]] area from the decompression chamber; opened after shutting down the last generator. |
||
====Cryo lab/Cryo storage==== |
====Cryo lab/Cryo storage==== |
||
| − | [[ |
+ | [[Elliott Tercorien]] will assist in the cryo lab area if asked. He will not rejoin the party if asked to leave after having already visited the area. Having Elliot in this area unlocks the unique ability to create [[cryo mine]]s and [[cryo grenade]]s. |
| − | Upon entering the labs, hostile aliens will attack from the right. |
+ | Upon entering the labs, hostile aliens will attack from the right. The left room is accessible by passing over the glass floor. On the wall next to the door is a switch which will unlock the room below, containing alien and wasteland items. |
| − | Proceed back upstairs and turn to the right. Face north and proceed through the open door |
+ | Proceed back upstairs and turn to the right. Face north and proceed through the open door, and there will be aliens as well as drones in the room. |
| − | On both sides of the room there are switches |
+ | On both sides of the room there are switches activating one [[alien captive recorded log]] or thawing a ghoul and a raider. Upon leaving that room there is a similar room with the same cryo-storage pods. Activating them will release another ghoul and raider. |
| + | Entering the next room, the Lone Wanderer will, through a window and an open door, observe an examination room with some aliens conducting experiments. If Elliott is accompanying them, he will shout out that the aliens were experimenting on the members of his former squad, and will then proceed to hit a control under the window. This will seal the doors and release freezing gases into the room, killing all aliens inside who will be seen banging on the window pleading. |
||
| − | Upon passing through that room, the player will come across an examination room. Activating the switch will seal the doors and freeze everything inside, including the aliens that are conducting experiments. |
||
| − | The |
+ | The room itself contains two pods with Elliott's former comrades: [[Beckett|Private Beckett]] and [[Daniels|Sergeant Daniels]]. With Elliot present, the options are available to leave, euthanize, or try and revive them. If they are revived before Elliott has checked on their status, they will both become instantly hostile and fight each other to the death before then attacking the the party. complete research to restore his squad members' memories, until he tells the Lone Wanderer that it is safe to trigger the release switch. The two soldiers will then join their party within the cryo-lab and storage, until they die from damage or after a scripted time from the substances administered to them by the aliens in their experiments. |
| − | + | Afterwards, the main cryo-storage bay will be entered, in which there are several aliens and one [[Automated turret (Fallout 3)|automated turret]], each on the two upper level strips as well as on the area below. There are switches to release ghouls and raiders in cryo-pods on the upper level. On the lower level, there are two areas with two pods each containing [[Vault 87 super mutant|super mutant]]s (leveled right up to [[Vault 87 super mutant#Super mutant overlord|super mutant overlords]]). They can be released by switches on the upper level, just above them. |
|
| + | After all the enemies are destroyed, face north and head down one of the corridors on the upper level. At the end of the corridor will be the generator to destroy. |
||
| − | An alternative solution to the above-mentioned room is to enter a control-room just before this one, close the door, and hit the switch to release all pods at once. The ensuing fights should usually only leave the turrets standing. |
||
| ⚫ | |||
| − | After all the enemies are destroyed, face north and head down the corridor. This is on the second level. If you go downstairs, you are proceeding in the wrong direction. At the end of the corridor will be the generator. Destroy the generator. You may find that it is impossible to exit the way you entered and it is easier to go right out of the generator room and then use the teleporter to go back to the beginning of the Cryo Lab. |
||
| − | |||
| ⚫ | |||
====Hangar Bay==== |
====Hangar Bay==== |
||
| − | [[Paulson]] will assist in the |
+ | [[Paulson]] will assist in the hangar bay area, if asked in the [[engineering core]]. |
| − | The generator is located at the top balcony in the hangar. Kill all of the aliens in the hangar area (balcony across from where you walk into the hangar, hangar floor and uppermost balcony). When |
+ | The generator is located at the top balcony, in the hangar. Kill all of the aliens in the hangar area (balcony across from where you walk into the hangar, hangar floor and uppermost balcony). When going to the balcony across from the one on which they first entered, push the switch to open up the sealed door and this will take the party to the top balcony. |
| − | Walk all the way through corridors and up the stairs until |
+ | Walk all the way through corridors and up the stairs until an encounter with two drones appears. Go left after dealing with them, and follow the wall around and there is another blocked door. Pushing the switch to open it sets off an alarm which will begin an alien retaliation. |
| + | At this point, a stream of aliens and drones will come from the two formerly blocked doors on the lower level, right an left of the well from your vantage point. Activating the six pylon controls will send nearby hostiles flying, damaging or obliterating them. One this encounter has been dealt with, the door leading to the area's generator will become unblocked. |
||
| ⚫ | Conveniently, there are two healing archways forming a path between the generator room door and the balcony overlooking the hangar. Also of note: by the end of the battle, a hatch raises into place below the levitating alien craft (the [[ |
||
| ⚫ | |||
| − | Now go back up to the balcony to the door where you set the alarm off. Walk in the door that is now open and directly in front of you is a blue switch. Press it and the generator and three coolants elevate. Like earlier in the DLC, activating all of the coolants will cause the generator to explode. Exit the way you entered. |
||
====Robot Assembly==== |
====Robot Assembly==== |
||
[[Somah]] will assist in the robot assembly area, if asked in the engineering core. |
[[Somah]] will assist in the robot assembly area, if asked in the engineering core. |
||
| − | If |
+ | If Somah is brought into this area, she will disappear through a teleporter, telling them that she will try and fiddle with the teleporter controls. Head downstairs and to the right. Straight ahead is a corner shelf in an area abundant with [[alien epoxy]]. On one of those shelves and on the floor, one can find five units of [[Alien power cell (Fallout 3)|alien power cell]]s (2 x 12, 1 x 20, 2 x 50). Back down the main hall, there is a healing archway to the right. |
| − | Upon entering the second room, turn right. Behind the pillars and against the |
+ | Upon entering the second room, turn right. Behind the pillars and against the back wall, there are several (4) biogels. |
| − | Follow the stream of partly assembled robots down to the end of the room |
+ | Follow the stream of partly assembled robots down to the end of the room. If present, Somah will suggest blowing a hole in the assembly line's casing to proceed to the next room. While shooting at the glass is ineffective, there is an access panel where the assembly line exits into a wall, which can be activated to cause an overload. The resulting explosion is rather large and forceful, so back up. |
| + | Entering a new area through the resulting hole, caused a confrontation with several [[guardian drone]]s and [[support drone]]s, as well as a small number of aliens. One of the aliens has the useful [[drone control device]], which can be looted from their corpse. A healing archway will be under the second level, and from there, proceed forward down the stairs and on to the generator. |
||
| − | At the very end of the room, you should see all the robots going into a machine that's on the wall, and on the side of this machine is a blue robot symbol. There you can override the machine, causing it to explode and knock you over. Now there is a hole in the side of it which you can walk through into the next room. |
||
| − | |||
| − | In this next room, approximately 3 [[guardian drone]]s, 5 [[support drone]]s and a minimum of two aliens will attack the PC. One of the aliens has the useful [[drone control device]]. Upstairs you'll find alien epoxy and [[alien biogel]]. A healing archway will be under the second level. From there you proceed forward, down the stairs and on to the generator. For a quick exit after destroying the generator, follow the two hallways directly behind you to reach a teleportation pad that will send you to one of the inactive pads you saw when you first entered the robot assembly area. |
||
===Gain access to the upper level=== |
===Gain access to the upper level=== |
||
| + | Once all three generators have been destroyed, the [[decompression chamber]] becomes available. |
||
| − | Once all three generators have been destroyed, the [[decompression chamber]] becomes available. If you wish to complete the [[Alien Archivist]] achievement, now is the time to be sure that all the [[alien captive recorded log]]s thus far have been collected (those from the [[holding cells]], [[engineering core]], [[cryo lab]], [[Cryo lab|cryo storage]], [[waste disposal]], and [[research lab]] (you should have 19 of the of 25)), as most of these areas will be closed off and can not be re-entered once the spacewalk has been started. Also, if you want to get the [[MPLX Novasurge]] or other loot available in rooms off of the Engineering Core, now is your last chance. |
||
| − | Enter the chamber and put on the [[ |
+ | Enter the chamber and put on the [[Spacesuit (Mothership Zeta)|spacesuit]] looted from [[Hartigan|Colonel Hartigan]]. Press the room's single control switch, which decompresses the airlock, allowing the Lone Wanderer through several doors to a new area, the [[space walk]]. Along the way, several dead aliens and an optional side room with two containers and several (4) alien biogels can be discovered. |
| − | While in space, |
+ | While in space, the [[Pip-Boy 3000]] cannot be accessed, weapons cannot be drawn, and the rest option cannot be utilized. While there are aliens that can be seen running below the glass, they cannot be interacted with and can be safely ignored. |
| − | During |
+ | During the space walk, three exposed panels are needed to activate the large teleporter in the middle. The first is just to the right from where the Lone Wanderer first emerged from the airlock. The second is all the way across the ship, almost opposite the first. The third is very close to the central teleporter itself. |
Once all three panels are activated, step into the now-active transporter to end this quest and begin [[This Galaxy Ain't Big Enough...]] |
Once all three panels are activated, step into the now-active transporter to end this quest and begin [[This Galaxy Ain't Big Enough...]] |
||
| − | |||
| − | Note that you cannot remove your space suit until you re-compress the atmosphere in the next chamber. |
||
===Reward=== |
===Reward=== |
||
| − | * 300 [[Experience |
+ | * 300 [[Experience Points|XP]] |
==Quest stages== |
==Quest stages== |
||
{{Quest stage table |
{{Quest stage table |
||
| − | |stage1 = |
+ | |stage1 =10 |
| − | |desc1 =Release the humans in stasis |
+ | |desc1 =Release the humans in stasis |
| − | |stage2 = |
+ | |stage2 =20 |
| − | |desc2 =Speak to Sally |
+ | |desc2 =Speak to Sally |
| − | |stage3 = |
+ | |stage3 =30 |
| − | |desc3 =Destroy the generator in the Cryo Lab |
+ | |desc3 =Destroy the generator in the Cryo Lab |
| − | |stage4 = |
+ | |stage4 =35 |
| − | |desc4 = |
+ | |desc4 =(Optional) Request help from the people you've revived |
| − | |stage5 = |
+ | |stage5 =40 |
| − | |desc5 =Destroy the generator in the |
+ | |desc5 =Destroy the generator in the Hangar |
| − | |stage6 = |
+ | |stage6 =50 |
| − | |desc6 = |
+ | |desc6 =Destroy the generator in the Robot Assembly |
| − | |stage7 = |
+ | |stage7 =60 |
| − | |desc7 =Speak to Sally |
+ | |desc7 =Speak to Sally |
| − | |stage8 = |
+ | |stage8 =70 |
| − | |desc8 =Gain access to the upper level of the |
+ | |desc8 =Gain access to the upper level of the alien ship |
| − | |stage9 = |
+ | |stage9 =80 |
| − | |desc9 =Find a way to activate the Access Teleporter |
+ | |desc9 =Find a way to activate the Access Teleporter |
|status9 =finish |
|status9 =finish |
||
|}} |
|}} |
||
==Notes== |
==Notes== |
||
| ⚫ | * The human bodies in the "operating room" at the end of the cryo lab are initially unnamed wastelanders should the Lone Wanderer decide to enter the labs alone; however, if the they ask Elliott Tercorien to accompany them, the bodies will instead be renamed [[Rheems|Corporal Rheems]], [[Spurlock|Corporal Spurlock]], and [[Lawrence Mears|Private Mears]] - Elliott's missing squad. Additionally, the two empty chambers in the adjoining room will now contain two soldiers, [[Beckett|Private Beckett]] and [[Daniels|Sergeant Daniels]], who can be revived and made to accompany the party through the cryo storage for a limited amount of time before they are either killed or die on their own. |
||
| ⚫ | |||
| ⚫ | |||
| ⚫ | |||
| − | * The |
+ | * The Lone Wanderer's head will explode if the spacesuit is not worn while in a depressurized area. |
| ⚫ | |||
| ⚫ | |||
| ⚫ | * During the space walk at the end of this quest, the Lone Wanderer does not experience free fall or zero gravity, but walks along the ship's hull, though their speed is decreased. The ship's artificial gravity only affects the Lone Wanderer while within the circle of red lights on the top of the bottom saucer section. Attempting to leave the prescribed area will result in the Lone Wanderer losing contact with the hull and floating off into space to their death. |
||
| ⚫ | * The human bodies in the "operating room" at the end of the cryo lab are initially unnamed wastelanders |
||
| − | * While |
+ | * While in the airlocks, the sound level changes from loud sounds through the air to softer sounds through the boots in the first airlock, and vice versa in the second, but the change happens instantly, rather than gradually as it should. |
| + | * It appears that the Lone Wanderer's bare fingers are exposed to the extreme temperatures and vacuum of space, due to the presence of the Pip-Boy. |
||
| + | * Aliens can be seen and heard running about if the player looks down through the ship's windows while on the space walk. |
||
| + | * [[Toshiro Kago]]'s [[samurai's sword]] disappears once all three generators have been destroyed. |
||
==Bugs== |
==Bugs== |
||
| − | * {{Platforms|ps3|xbox360|pc}} Upon entering the room with the two soldiers in the Cryo Lab, the entrance doors may become locked and the teleporter is inoperative. This results in being stuck in this level. This only happens when |
+ | * {{Platforms|ps3|xbox360|pc}} Upon entering the room with the two soldiers in the Cryo Lab, the entrance doors may become locked and the teleporter is inoperative. This results in being stuck in this level. This only happens when the player activates the revival process before Elliott is ready thus resulting in the death of his squad mates. When this happens Elliott will have a speech option asking him why the doors have locked. If the player chooses this option Elliott tells the player that "we probably just have to wait for the decontamination cycle to end." despite the fact that no matter how long the player waits, the doors will not open. There are two solutions. Solution 1: save, then power down the console/exit the game on the PC. Load that save and the teleporter should be operational again. If this occurs on the PS3 version, restarting the console has no effect. Solution 2: Sadly, killing Elliott Tercorian does fix the problem. This results in no negative Karma. Killing the revived soldiers also fixes the problem. {{Verify|verified}} |
| ⚫ | |||
| − | * {{Platforms|pc|xbox360}} Due to the sheer number of attackers in the Hangar battle sequence, many corpses disappear after the dust settles. If Paulson dies in this battle, his might be one of those disappearing corpses, thus making it impossible to loot Paulson's revolver. |
||
| + | * {{Platforms|pc}} The initial airlock is right at the edge of the artificial gravity border. The Pip-Boy direction marker incorrectly points to this airlock during the space walk. Returning to this airlock may count as crossing the border and the cinematic of your floating death will play. {{Verify|verified}} |
||
| ⚫ | |||
| + | * {{Platforms|xbox360}}The player will lose karma if they take off the spacesuit while inside the decompression chamber. |
||
| ⚫ | |||
{{Navbox quests FO3}} |
{{Navbox quests FO3}} |
||
| ⚫ | |||
[[Category:Mothership Zeta quests]] |
[[Category:Mothership Zeta quests]] |
||
[[Category:Mothership Zeta achievements and trophies]] |
[[Category:Mothership Zeta achievements and trophies]] |
||
| + | [[de:Im Sternenhimmel]] |
||
[[ru:Среди звёзд]] |
[[ru:Среди звёзд]] |
||
Revision as of 09:00, 18 October 2014
Among the Stars is a Fallout 3 main quest and achievement in the Mothership Zeta add-on.
Quick walkthrough
| Main Quest: Among the Stars | |||||||||||||
| Talk to Sally. | |||||||||||||
| Go to the Cryo Core. | (Optional) Request help in the Cryo Core from Elliott Tercorien. | ||||||||||||
| Find and overload the power module in the Cryo Core. | |||||||||||||
| Go to the Hangar. | (Optional) Request help in the Hangar from Paulson. | ||||||||||||
| Find and overload the power module in the Hangar. | |||||||||||||
| Go to the Robot Assembly. | (Optional) Request help in the Robot Assembly from Somah. | ||||||||||||
| Find and overload the power module in the Robot Assembly. | |||||||||||||
| Take the space suit from Colonel Hartigan. | |||||||||||||
| Enter the decompression chamber and activate the pressurisation sequence. | |||||||||||||
| Find and activate all three exposed panels. | |||||||||||||
| Step in to the now active central teleporter. | |||||||||||||
| Reward: 300 XP | |||||||||||||
| Leads to: This Galaxy Ain't Big Enough... | |||||||||||||
Detailed walkthrough
Destroy the generators
This quest is activated upon reaching the engineering core with the objective to destroy three of the ship's generators located in the hangar, cryo lab/cryo storage, and robot assembly areas, in order to gain access to the decompression chamber to proceed further.
- The option is available to bring Somah along, or one of the three abductees revived in the engineering core's southern portion to each of these three locations. See below for who will accompany the Lone Wanderer to which location; if the wrong companion is selected, they will tell you they are leaving once you enter.
- The generators are destroyed such as with the one blown up when freeing Sally in the holding cells area, i.e. using the control to bring the core up from the floor and then disabling the three cooling devices surrounding it.
- An overheating generator will be surrounded by more and more visible heat radiation which results in the generator blowing up in roughly 30 seconds.
- Apart from the above locations, there are three other new locations initially reachable from the engineering core: the cargo hold, engine room, and maintenance level are optional and unconnected to the quest, with the latter containing one of the alien captive recorded logs. These will become inaccessible once the Lone Wanderer enters the space walk area from the decompression chamber; opened after shutting down the last generator.
Cryo lab/Cryo storage
Elliott Tercorien will assist in the cryo lab area if asked. He will not rejoin the party if asked to leave after having already visited the area. Having Elliot in this area unlocks the unique ability to create cryo mines and cryo grenades.
Upon entering the labs, hostile aliens will attack from the right. The left room is accessible by passing over the glass floor. On the wall next to the door is a switch which will unlock the room below, containing alien and wasteland items.
Proceed back upstairs and turn to the right. Face north and proceed through the open door, and there will be aliens as well as drones in the room.
On both sides of the room there are switches activating one alien captive recorded log or thawing a ghoul and a raider. Upon leaving that room there is a similar room with the same cryo-storage pods. Activating them will release another ghoul and raider.
Entering the next room, the Lone Wanderer will, through a window and an open door, observe an examination room with some aliens conducting experiments. If Elliott is accompanying them, he will shout out that the aliens were experimenting on the members of his former squad, and will then proceed to hit a control under the window. This will seal the doors and release freezing gases into the room, killing all aliens inside who will be seen banging on the window pleading.
The room itself contains two pods with Elliott's former comrades: Private Beckett and Sergeant Daniels. With Elliot present, the options are available to leave, euthanize, or try and revive them. If they are revived before Elliott has checked on their status, they will both become instantly hostile and fight each other to the death before then attacking the the party. complete research to restore his squad members' memories, until he tells the Lone Wanderer that it is safe to trigger the release switch. The two soldiers will then join their party within the cryo-lab and storage, until they die from damage or after a scripted time from the substances administered to them by the aliens in their experiments.
Afterwards, the main cryo-storage bay will be entered, in which there are several aliens and one automated turret, each on the two upper level strips as well as on the area below. There are switches to release ghouls and raiders in cryo-pods on the upper level. On the lower level, there are two areas with two pods each containing super mutants (leveled right up to super mutant overlords). They can be released by switches on the upper level, just above them.
After all the enemies are destroyed, face north and head down one of the corridors on the upper level. At the end of the corridor will be the generator to destroy.
There are four alien captive recorded logs located in the cryo lab and two in the cryo storage.
Hangar Bay
Paulson will assist in the hangar bay area, if asked in the engineering core.
The generator is located at the top balcony, in the hangar. Kill all of the aliens in the hangar area (balcony across from where you walk into the hangar, hangar floor and uppermost balcony). When going to the balcony across from the one on which they first entered, push the switch to open up the sealed door and this will take the party to the top balcony.
Walk all the way through corridors and up the stairs until an encounter with two drones appears. Go left after dealing with them, and follow the wall around and there is another blocked door. Pushing the switch to open it sets off an alarm which will begin an alien retaliation.
At this point, a stream of aliens and drones will come from the two formerly blocked doors on the lower level, right an left of the well from your vantage point. Activating the six pylon controls will send nearby hostiles flying, damaging or obliterating them. One this encounter has been dealt with, the door leading to the area's generator will become unblocked.
Conveniently, there are two healing archways forming a path between the generator room door and the balcony overlooking the hangar. Also of note: by the end of the battle, a hatch raises into place below the levitating alien craft (the recon craft Theta), completing the floor beneath.
Robot Assembly
Somah will assist in the robot assembly area, if asked in the engineering core.
If Somah is brought into this area, she will disappear through a teleporter, telling them that she will try and fiddle with the teleporter controls. Head downstairs and to the right. Straight ahead is a corner shelf in an area abundant with alien epoxy. On one of those shelves and on the floor, one can find five units of alien power cells (2 x 12, 1 x 20, 2 x 50). Back down the main hall, there is a healing archway to the right.
Upon entering the second room, turn right. Behind the pillars and against the back wall, there are several (4) biogels.
Follow the stream of partly assembled robots down to the end of the room. If present, Somah will suggest blowing a hole in the assembly line's casing to proceed to the next room. While shooting at the glass is ineffective, there is an access panel where the assembly line exits into a wall, which can be activated to cause an overload. The resulting explosion is rather large and forceful, so back up.
Entering a new area through the resulting hole, caused a confrontation with several guardian drones and support drones, as well as a small number of aliens. One of the aliens has the useful drone control device, which can be looted from their corpse. A healing archway will be under the second level, and from there, proceed forward down the stairs and on to the generator.
Gain access to the upper level
Once all three generators have been destroyed, the decompression chamber becomes available.
Enter the chamber and put on the spacesuit looted from Colonel Hartigan. Press the room's single control switch, which decompresses the airlock, allowing the Lone Wanderer through several doors to a new area, the space walk. Along the way, several dead aliens and an optional side room with two containers and several (4) alien biogels can be discovered.
While in space, the Pip-Boy 3000 cannot be accessed, weapons cannot be drawn, and the rest option cannot be utilized. While there are aliens that can be seen running below the glass, they cannot be interacted with and can be safely ignored.
During the space walk, three exposed panels are needed to activate the large teleporter in the middle. The first is just to the right from where the Lone Wanderer first emerged from the airlock. The second is all the way across the ship, almost opposite the first. The third is very close to the central teleporter itself.
Once all three panels are activated, step into the now-active transporter to end this quest and begin This Galaxy Ain't Big Enough...
Reward
- 300 XP
Quest stages
Notes
- The human bodies in the "operating room" at the end of the cryo lab are initially unnamed wastelanders should the Lone Wanderer decide to enter the labs alone; however, if the they ask Elliott Tercorien to accompany them, the bodies will instead be renamed Corporal Rheems, Corporal Spurlock, and Private Mears - Elliott's missing squad. Additionally, the two empty chambers in the adjoining room will now contain two soldiers, Private Beckett and Sergeant Daniels, who can be revived and made to accompany the party through the cryo storage for a limited amount of time before they are either killed or die on their own.
- Access to the maintenance level and waste disposal areas are permanently disabled once the Lone Wanderer has begun the space walk portion of the quest.
- The Lone Wanderer's head will explode if the spacesuit is not worn while in a depressurized area.
Example of death by floating off into space
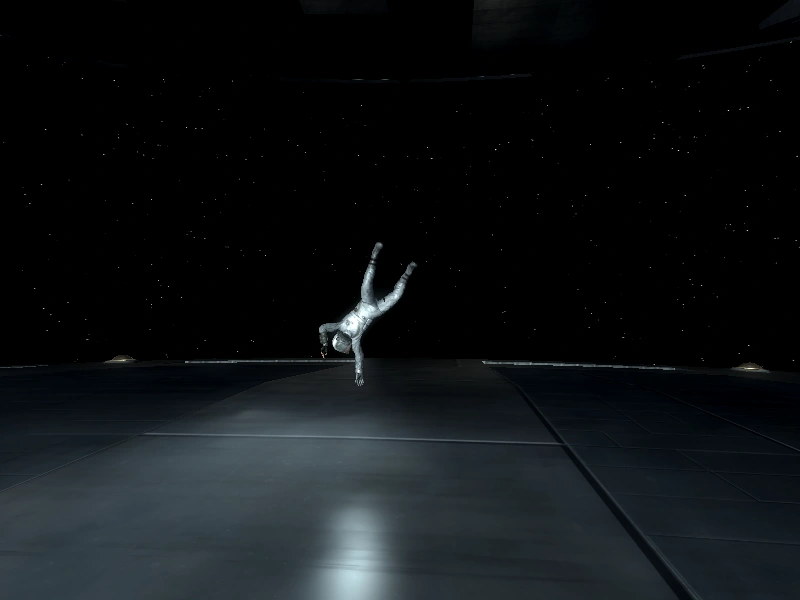
- During the space walk at the end of this quest, the Lone Wanderer does not experience free fall or zero gravity, but walks along the ship's hull, though their speed is decreased. The ship's artificial gravity only affects the Lone Wanderer while within the circle of red lights on the top of the bottom saucer section. Attempting to leave the prescribed area will result in the Lone Wanderer losing contact with the hull and floating off into space to their death.
- While in the airlocks, the sound level changes from loud sounds through the air to softer sounds through the boots in the first airlock, and vice versa in the second, but the change happens instantly, rather than gradually as it should.
- It appears that the Lone Wanderer's bare fingers are exposed to the extreme temperatures and vacuum of space, due to the presence of the Pip-Boy.
- Aliens can be seen and heard running about if the player looks down through the ship's windows while on the space walk.
- Toshiro Kago's samurai's sword disappears once all three generators have been destroyed.
Bugs
 Upon entering the room with the two soldiers in the Cryo Lab, the entrance doors may become locked and the teleporter is inoperative. This results in being stuck in this level. This only happens when the player activates the revival process before Elliott is ready thus resulting in the death of his squad mates. When this happens Elliott will have a speech option asking him why the doors have locked. If the player chooses this option Elliott tells the player that "we probably just have to wait for the decontamination cycle to end." despite the fact that no matter how long the player waits, the doors will not open. There are two solutions. Solution 1: save, then power down the console/exit the game on the PC. Load that save and the teleporter should be operational again. If this occurs on the PS3 version, restarting the console has no effect. Solution 2: Sadly, killing Elliott Tercorian does fix the problem. This results in no negative Karma. Killing the revived soldiers also fixes the problem. [verified]
- After the loading screen at the end of the space walk, it says the player is gaining rads for a split second, long enough to gain a single rad. The oxygen meter flashes on-screen as well. The reason for this is unknown. [verified]
- The initial airlock is right at the edge of the artificial gravity border. The Pip-Boy direction marker incorrectly points to this airlock during the space walk. Returning to this airlock may count as crossing the border and the cinematic of your floating death will play. [verified]
- The player will lose karma if they take off the spacesuit while inside the decompression chamber.
| |||||||||||||||||||||||||||||||||||||||||||||||||||||